The Citroens
Image Gallery
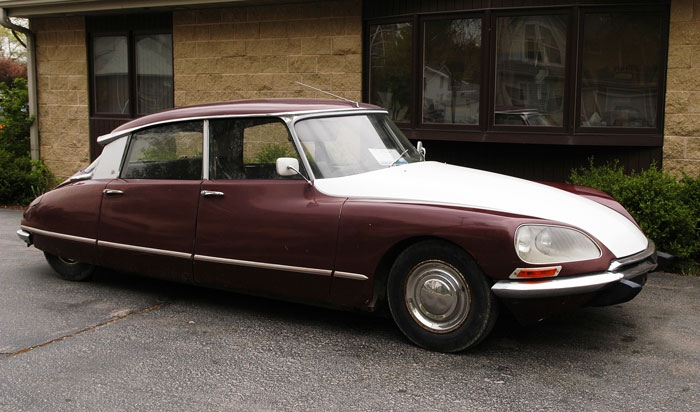
This is the second Citroen owned by this customer. The first (all white) became a parts car.
Notice the transplanted white hood from the first Citroen. It replaced the maroon hood on this 1971 car which was damaged in transit.
Second Car (1971 maroon colored)
First major visit December, 2004:
Battery: replace cables, add extra ground, charge battery.
Attempt to start car: it starts and runs but only on starting fluid.
Wash and inspect for leaks:
Two at the rear suspension boots.
One at the master cylinder boot.
Repair all as required.
Exhaust: install customer supplied exhaust, fabricate hangers as required.
Hydraulics: Pump is very loud, install pump from first car.
Brakes: New front pads, clean and lube pins. Clean and adjust rear shoes.
Change oil and filter: correct all fluids and tire pressures.
Many lights inoperative: repair as required. The brake light switch is missing pieces. Build missing pieces, install and adjust switch.
Major tune: plugs, insulators, cap, rotor, wires, points. Road time engine for optimum performamce.
Adjust valves: clean valve cover and replace gasket
Replace broken throttle linkage with unit from first car.
Engine breather system is broken: Remove parts from first car. Access very poor, torch away obstructions as required.
Choke cable broken, install unit from first car.
Replace damaged hood and latches with hood from first car. Adjust as required.
Road test, car is only running at 80% of what can be expected.
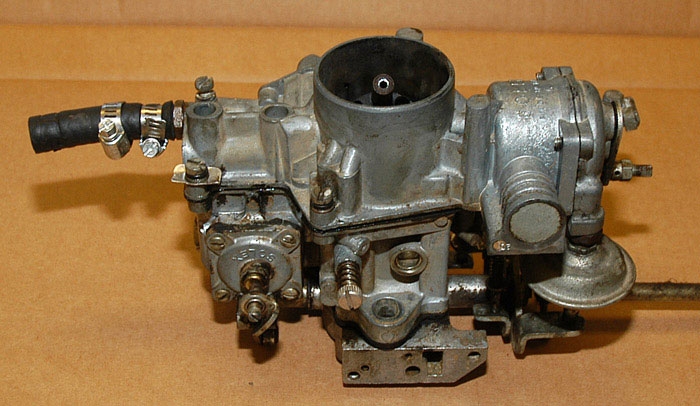
Further inspection shows major water and rust in gas tank. Repeatedly flush tank using gallons of isopropyl alcohol. Clean tank screen and replace filter. Disassemble carburetor and clean out sediment. Carburetor cannot be adjusted to obtain satisfactory idle quality. It is running too lean (not enough gas) at idle. Using the idle jets from old VW carbs and progressively drilling them out, we finally obtained the proper adjustment.
Car now runs very well!
Second major visit August, 2005:
Replace all five hydraulic suspension accumulators: The worn units are causing the pump to run too much. Bleed hydraulic system as required and road test. Big improvement in handling and road control.
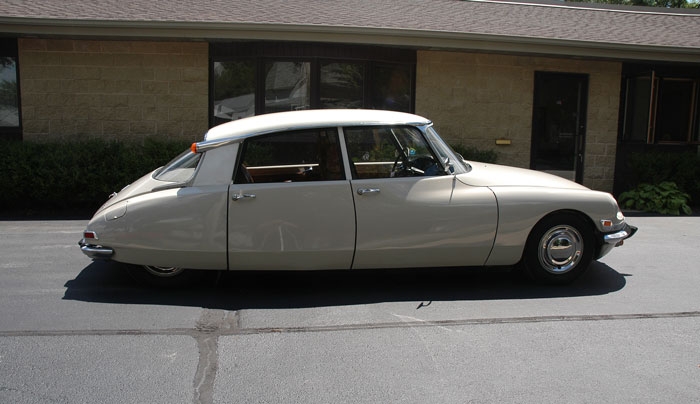
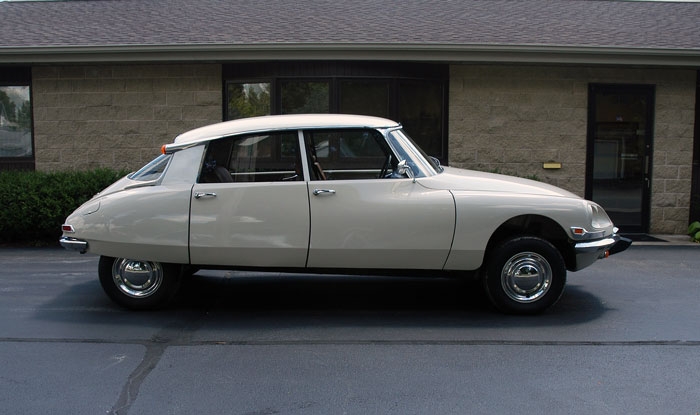
Our customer will soon sell this car and locate a beautiful cream colored 1971 in Canada. We would like to introduce it in images 2 and 3 as we start our process again.
Third car (1971 cream colored):
Note: As we discuss this next car we are going to begin with the Citroen’s unique and fascinating generalities (see images 2 thru 4 and the paragraph below) then move to the more interesting challenges we faced restoring this car. This means you can take for granted it received brakes, exhaust, tuning, electrical repair, etc. We don’t think our audience is interested in hearing about brakes for the 5th time.
This is the third Citroen owned by this customer. The interior is as clean as the exterior and the mechanicals have all been put into order. The customer drives this car to shows and on trips. It is not exactly a daily driver but must be “stone axe” reliable.
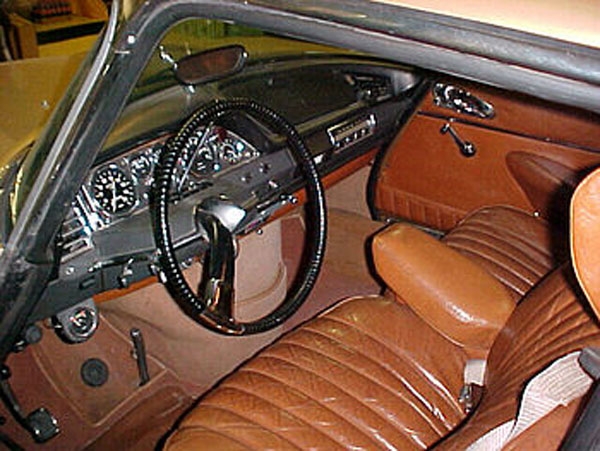
Some additional interesting facts about full hydraulic suspension:
The car rides smoother than any Lincoln or Cadillac. It feels almost like riding on a cushion of air.
The power for the steering comes from the same hydraulic system. The steering wheel has one single spoke.
The power for the brakes also comes from the hydraulic system. On some Citroens the brake pedal is round and is called a “mushroom brake”. It’s a little hard to modulate a mushroom brake at first, but one soon gets used to it. The stopping ability of hydraulics and huge front disc brakes is amazing.
First major visit November, 2005:
First visits are often big lists of small things. We won’t bore you with the particulars of this one. They are similar to the maroon car.
Second major visit July, 2006: Eight months later would begin the year-long war between Motor Works and the Gremlins over who owned the fuel system on this car. They would come at us from four different directions; fuel tank, fuel pump, pressure regulator and carburetor. We would have to win some battles (like the carburetor) more than once. The Gremlins even pursued “scorched earth” tactics; making certain critical parts were not available. In the end Motor Works won, but like Caesar attacking the Gauls across the Rhine we would have to build to do it.
The car was towed in after having filled it with gas the previous day. Examination showed the fuel filter was full of rust and sediment.
We pulled the tank drain and flushed the tank for hours. The rust and sediment had formed a “hard pack” covering and were not going to be dislodged while the tank was on the car. Pulling the tank is difficult but we had no choice. It includes removal of the rear seat, tank cover, seat belts, trim, hoses, pipes, side, under and rocker panels. With the tank out it could be power flushed with water and final flushed with gasoline and alcohol. Upon reinstallation and filling we noted a small pinhole in the tank leaking gas. Removing the “hard pack” covering had exposed a rusted through tank. The tank was drained yet again and temporarily repaired with a special gas tank epoxy.
The sediment had of course also filled the carburetor. We contacted several parts sources and were told there are no overhaul parts for this carburetor. It was built as a throw-a-way unit should something go wrong. We disassembled the carburetor anyway and found the internals in relatively good condition except for the rust and a torn accelerator pump diaphragm. The carb responded well to cleaning and we “stole” a used diaphragm from an old VW carb. Both carburetors are made by the Solex company and while very different, a few of the parts will interchange.
Once the lines were cleaned, the filter replaced and everything reassembled we road tested the car expecting a full recovery. We had anything but! It still felt like fuel starvation. After another hour of testing and inspection we spied a cheap fuel pressure regulator tucked away on the inner fender. We removed the regulator and hit the road for another test. Bingo! The last puzzle piece had fallen into place. The car ran great.
Third major visit August, 2006: The gas tank was another rust leak just waiting to occur. It had to be taken care of permanently and there is just one way short of replacement. The tank would head to Buttita Bros in Rockford for their gas tank coating process.
Tanks are cleaned to bare metal and stripped of all plastic internally and externally. Metal parts are fabricated to replace the plastic if required. Sometimes this means the tank is cut in half and resoldered. The tank is then coated inside and out with a special sealer and cooked to harden. The finished product comes with a lifetime guarantee against leakage.
We reinstalled the tank and had to perform minor modifications due to changes in tank size and feed line position. After filling with gas, we put extensive miles on the car and reinspected it. No leaks, no runs, no drips, no errors.
Fourth major visit August, 2007: Almost exactly a year later it was “déjà vu all over again”. The car came in smelling of gas. Inspection found that gas was dripping from the carburetor. It was flooding so badly the engine oil was overfull and gassy. We removed the carb top and inspected the internals. The needle and seat were sticking and the gaskets were disintegrating. We would have to overhaul the carburetor, but how with no parts available?
We started with a carb overhaul kit for a VW Beetle. We knew some of the parts would interchange. Let’s find out how many. Well, it turned out only two parts interchanged. Not great but it was a start. We could use the accelerator pump diaphragm and the needle and seat (with some modification).
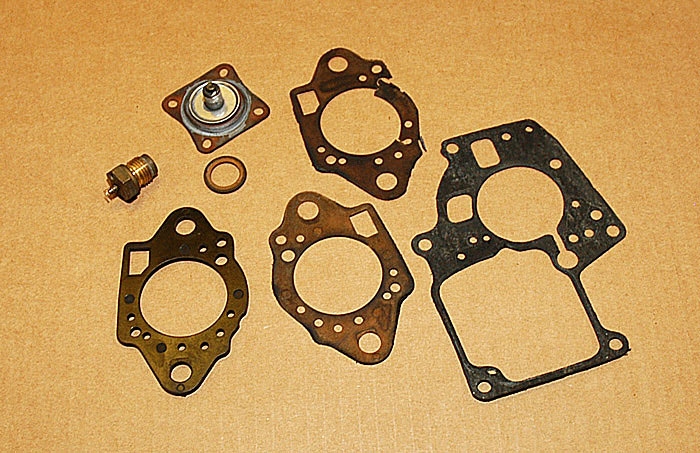
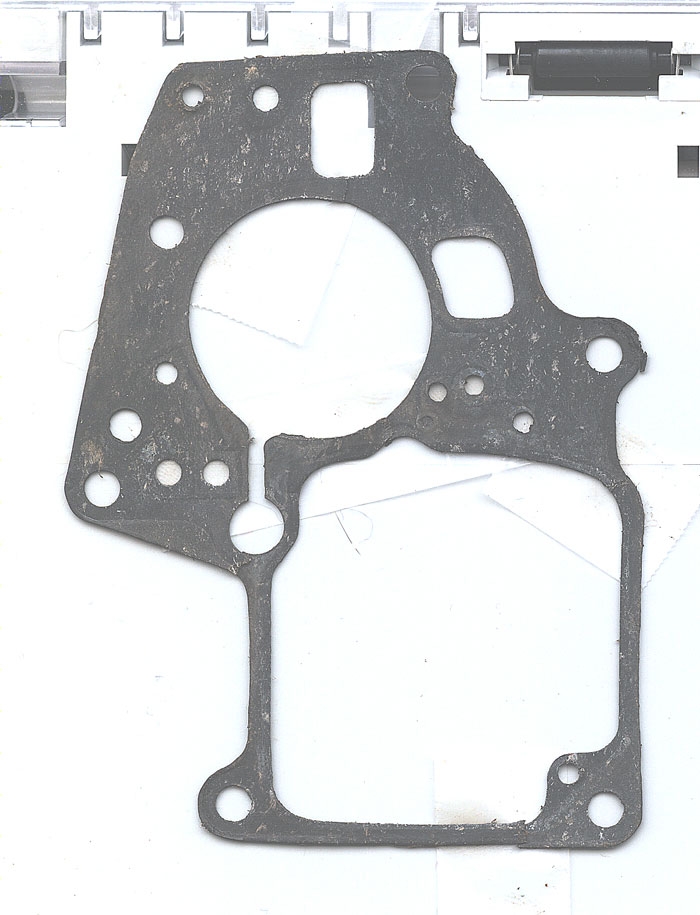
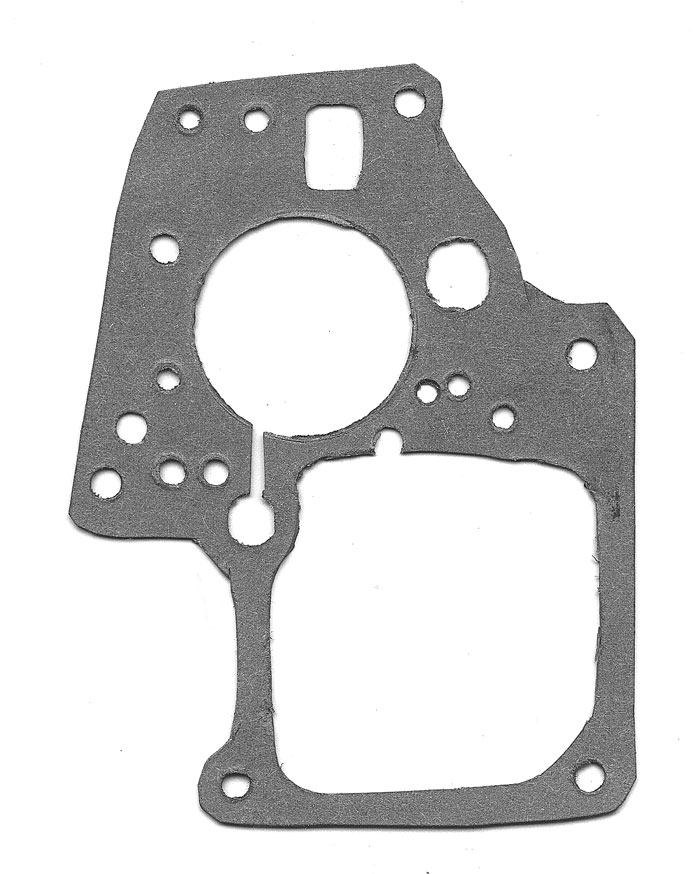
What to do about the gaskets we had to have? We thought for a bit and decided we could build them despite their intricacy. We carefully taped the crumbling gaskets to a piece of paper and scanned them into Photoshop on a computer. After adjusting them slightly we printed them onto a piece of thick gasket paper, and painstakingly cut the outlines with a small scissors and an X-Acto knife. The small holes were punched with sharpened steel brake lines of varying diameters.
We changed the oil and eagerly started the car with its freshly overhauled carburetor. Immediately happy and expectant faces turned to sad. The carb still floods, although not nearly as bad. We had expected a cure, not progress.
Back to testing. Early in the process (thank goodness) we find fuel pressure is over 7 psi. Specification for this carb is about ½ that at 3 psi. We look around and find the mechanical fuel pump is being assisted by an electrical add on fuel pump. What the heck? The answer is obvious. We eliminate the mechanical pump and install a Holley racing low pressure adjustable regulator to work with the electrical pump. You will hear about that regulator often in our other classic car projects. Using a dozen brass fittings to get the odd angles we want, we start the engine, adjust the regulator and proceed to put 20 smooth miles on the car. Hooray, it’s fixed.
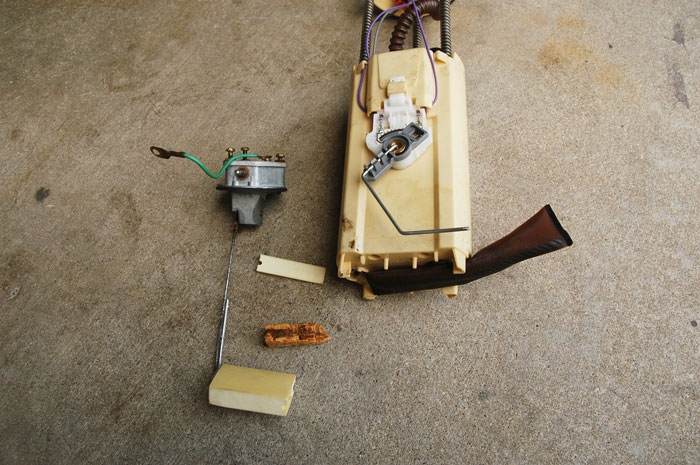
BUT, THE GAS GAUGE DOES NOT WORK! It is stuck just off empty on a full tank. After consulting the customer we head off again to diagnose another fuel system problem. Testing proves the problem lies with the sender itself inside the gas tank. We remove the sender and notice the float is partially disintegrated. What’s more, the portion of the float that remains is saturated with gas and no longer floats. We are again faced with getting parts that do not exist. What do we do? WE BUILD A NEW FLOAT! If the readers reaction is Huh? What? Oh come on! Build a float? “Yeah, and I suppose you gotta bridge you wanna sell me?” I don’t blame them, but let’s press on.
Float building 101: The source for our new float was a brilliant idea by our Service Writer, Leslie. She suggested using the float from a junk GM fuel pump/sender assembly. We cut the float and part of the arm off the old sender. The float was trimmed to fit and the arm silver soldered to the arm on the Citroen sender.
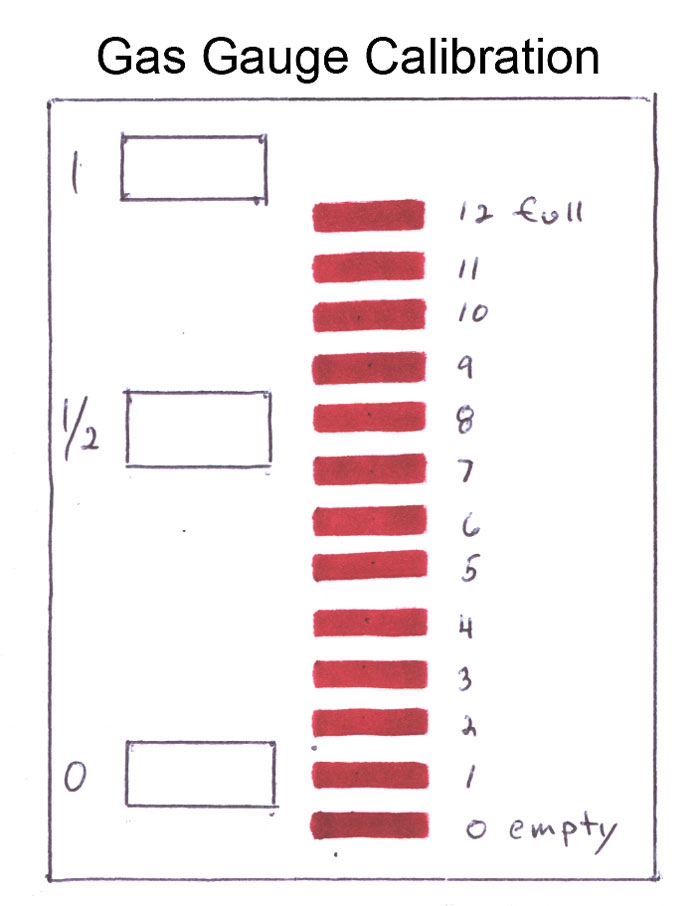
Upon reassembly (had to build a new sender gasket) we found the gas gauge worked but read inaccurately. This was not a big surprise but was a little disappointing. We then drained the tank and calibrated the sender and gauge together with our home made chart . After another 20 mile road test, we had to admit you can build a float. We had a winner.
A happy/sad testament to quality workmanship has occurred with this car. It has not come back to us in four years. I met the owner at a car show this last summer. He was showing off his beauty and telling the story of its restoration. We warmly shook hands and he apologized for not bringing the car back in. But, his reason was one of the nicer compliments I and Motor Works could get. He said “I drive it all over; to shows and on trips. It starts and runs great. Nothing ever goes wrong!”
Wow, I thought to myself. “Nothing ever goes wrong!” The Gremlins lost after all.